Wednesday, October 28, 2009

How to interpret fw monitor output files in Wireshark

By default, Wireshark provides 3 windows. The top window is the frame summary window where frame data is summarized. The middle window is the protocol window where protocol decoding is performed. The bottom window is the raw frame data. "FW-1 monitor if/direction" data can be displayed in each of these windows.


By default, this information is displayed in the raw frame data. It is located at the beginning of the frame, so look at the beginning of the ASCII part. For example, you might something like "i1eth-s3 p4c0..E.".


This isn't very easy to read.


A better approach is the enable protocol decoding.

1) Select Edit > Preferences to bring up the preferences window.


2) Under Protocols, select Ethernet . Enable "Attempt to interpret as FireWall-1 monitor file".


3) Click Apply and Ok


There will now be a "FW1 Monitor" protocol decoding between "Frame" and "Internet Protocol".


If you enabled "Attempt to interpret as FireWall-1 monitor file", you can also add a column to the frame summary. This is optional.

1) Select Edit > Preferences to bring up the preferences window.


2) Under the User Interface select Columns.


3) Click the "new" button to add a new column


4) For the Title, use whatever you want, e.g. "FW-1".

5) For the Format, select "FW-1 monitor if/direction".


6) Click Apply and Ok

There will now be a "FW-1" column in the frame summary window.

Tuesday, October 27, 2009

Man In The Middle (MITM) Attack (ettercap, metasploit, sbd)

Hey all!

Using a few tools to gain access to command line on the target PC.

What is this?
By setting up a fake web site, we social engineer our target to run our exploit. The end result gives us command line access to our target's PC.

How does this work?
> Ettercap to do the MITM Attack
> Metasploit for the exploit
> Secure BackDoor (SBD) for the backdoor
> Apache for the web server

What do I need?
> Ettercap
> Metasploit
> SBD (optional)
> Web server
*all of this is on backtrack 4*

How to:
Attackers IP: 192.168.1.104
Targets IP: 192.168.1.101
Gateway IP: 192.168.1.1

Notes:
This is cut from my final video called "g0tmi1k's home network".

Links
Download: 3 - MITM.mp4
Video: http://blip.tv/file/2319124
Commands: http://pastebin.com/f614e420b

[Script] FakeAP_pwn - Create a Fake AP with a auto bash script!

Hey all!

I've had a go at making a bash script to automate creating a fake AP and pwn who connects to it! (please, any pointers would be great as I'm new at this!)

What is this?
This is a bash script and a few other things to make a fake access point which is transparent (allowing target afterwards to surf the Inter-webs after they have been exploited!).

How does this work?
> It create a fake AP and DHCP server.
> Runs a web server & create an exploit with metasploit.
> Waits for target to connect, download and run the exploit after it allows them to surf the Inter-webs.
> Creates a backdoor with SBD (Secure BackDoor - bit like netcat!), though this could be replace with VNC if attacker wishes!
> Then starts a few sniffing programs to watch what target does!

What do I need?
> Two interfaces, one for Internet (wired/wireless) and the other for becoming an access point (wireless only!)
> A Internet connection (though you could mod it so its non transparent)
> airmon-ng, dhcpd3, apache,metasploit, snarf suit <--- All on BackTrack!

Whats in the 7z file?
> FakeAP_pwn.sh <--- The bash script to run.
> FakeAP_pwn.rc <--- Metasploit resource.
> sbd.exe <--- The backdoor.
> dhcpd.conf <--- My DHCP script if you need it.
> index.html <--- The page the target is force to see before they have access to the Internet.

How to use:
1.) Extract the 7z file to /root/FakeAP_pwn.
2.) Edit FakeAP_pwn.sh with your gateway, Internet interface, wireless AP interface.
3.) sh /root/FakeAP_pwn/FakeAP_pwn.sh
4.) Wait for a connection...
5.) Game Over.


Notes:
It works for me (=
I'm running BackTrack 4 Pre Final, The target is running Windows XP Pro SP3 (fully up-to-date 2009-03-25), with no firewall and no AV. Not tested with anything else!
The connections is reverse - so the connection comes from the target to attacker therefore as the attacker is the server it could help out with firewalls...
There is stuff comment out; the stuff at the end I want to happen (help?), the other stuff is other methods of doing the same thing!

Links
Download: http://mediafire.com/download.php?jndwwjnjn0g
Video: *Uploading *
Commands:
http://pastebin.com/f3971a16b
Idea/Source(s):
http://forums.remote-exploit.org/wireless/18863-wireless-key-harvester-including-video.html, http://forums.remote-exploit.org/wireless/18369-fake-ap-wep-wpa-key-grab-video-commands.html


~g0tmi1k

How to: Crack WPA/WPA2 (aircrack-ng + airolib-ng)

What is this?
How to crack a wireless network using WPA/WPA2 (PSK/AES) encryption with a connected client (as both have same method!) . Then using a pre-computed hash table which has been "pre- salted" with the ESSID for the network to get the pass-phrase.

How does this work?
> Captures a 4-way handshake
> Makes a quick DoS (Denial of Service) attack at connected client to force them to disconnect and reconnect
> Apply a brute force dictionary attack


What do I need?
> aircrack-ng.
> Wifi Card that supports monitor mode.
> Big dictionary.

How to:
1.) * See commands*

Notes:
This is cut from my final video called "g0tmi1k's home network".
The pass-phrase HAS to be in the dictionary - so if you use something like http://grc.com/pass, the chances of it being crack is next to nothing!
There HAS to be a CONNECT client.

Links
Download: http://www.mediafire.com/download.php?ezqunojm0mk
Video:
http://blip.tv/file/2318855/
Commands: http://pastebin.com/f3041b00c
Idea/Source(s):
http://forums.remote-exploit.org/tutorials-guides/8041-xploitz-video-volume-4-e-z-cracking-wpa-wpa2-airolib-ng-databases.html
Misc : Dictionaries

How to sniff HTTPS / SSL!

What is this?
This video shows that with SSL encryption, it isn't any more secure. Proof of this is seen by showing my web based email (Google Mail) & online bank (PayPal) password...

How does this work?
> Performing a 'Man In The Middle' attack therefore all the traffic flows through the attacker.
> Picks out HTTP traffic from port 80 and then packet redirection / forwarding onto a different port.
> SSLStrip is then listening on that port and removes the SSL connection before passing it back to the user.
> ettercap then picks out the username & password.

What do I need?
> sslstrip
> arpspoof
> ettercap
*all in BackTrack 4 Pre Final*

Commands:
Targets IP: 192.168.1.6
Gateway : 192.168.1.1

Notes:
You could save the packets instead, and then look through it later, in case ettercap doesn't pick up the information you need!

Links
Stream Video: http://blip.tv/file/2345515
Download Video:http://www.mediafire.com/download.php?jzt2kmmdzzr
Commands: http://pastebin.com/f2b34793e

Thursday, October 15, 2009

Backup file trước khi chỉnh sửa

khi bạn muốn "vọc" với những file quan trọng, trước tiên nên backup đã:
sudo cp /etc/sudoers /etc/sudoers.bak

Sau này có gì thì khôi phục lại:
sudo cp /etc/sudoers.bak /etc/sudoers

Configuring sudo and adding users to Wheel group

If a server needs to be administered by a number of people it is normally not a good idea for them all to use the root account. This is because it becomes difficult to determine exactly who did what, when and where if everyone logs in with the same credentials. The sudo utility was designed to overcome this difficulty.

With sudo (which stands for "superuser do"), you can delegate a limited set of administrative responsibilities to other users, who are strictly limited to the commands you allow them. sudo creates a thorough audit trail, so everything users do gets logged; if users somehow manage to do something they shouldn't have, you'll be able to detect it and apply the needed fixes. You can even configure sudo centrally, so its permissions apply to several hosts.

The privileged command you want to run must first begin with the word sudo followed by the command's regular syntax. When running the command with the sudo prefix, you will be prompted for your regular password before it is executed. You may run other privileged commands using sudo within a five-minute period without being re-prompted for a password. All commands run as sudo are logged in the log file /var/log/messages.


The sudo configuration file is /etc/sudoers. We should never edit this file manually. Instead, use the visudo command: # visudo

This protects from conflicts (when two admins edit this file at the same time) and guarantees that the right syntax is used (the permission bits are correct). The program uses Vi text editor.

All Access to Specific Users
You can grant users bob and bunny full access to all privileged commands, with this sudoers entry.
user1, user2 ALL=(ALL) ALL
This is generally not a good idea because this allows user1 and user2 to use the su command to grant themselves permanent root privileges thereby bypassing the command logging features of sudo.

Access To Specific Users To Specific Files
This entry allows user1 and all the members of the group operator to gain access to all the program files in the /sbin and /usr/sbin directories, plus the privilege of running the command /usr/apps/check.pl.
user1, %operator ALL= /sbin/, /usr/sbin, /usr/apps/check.pl

Access to Specific Files as Another User
user1 ALL=(accounts) /bin/kill, /usr/bin/kill, /usr/bin/pkill

Access Without Needing Passwords
This example allows all users in the group operator to execute all the commands in the /sbin directory without the need for entering a password.
%operator ALL= NOPASSWD: /sbin/

Adding users to the wheel group
The wheel group is a legacy from UNIX. When a server had to be maintained at a higher level than the day-to-day system administrator, root rights were often required. The 'wheel' group was used to create a pool of user accounts that were allowed to get that level of access to the server. If you weren't in the 'wheel' group, you were denied access to root.

If the following line were in sudoers, it would allow members of the wheel group to
run any command as any user with one exception: They would not be allowed to run
passwd to change the root password and #sudo su root


%wheel ALL=(ALL) ALL, !/usr/bin/passwd root, NOEXEC: /bin/su

This will allow anyone in the wheel group to execute commands using sudo (rather than having to add each person one by one).

Now finally use the following command to create wheel group and add any user (e.g- user1) to Wheel group

#groupadd wheel

#useradd -G wheel user1


Useful Commands in Ubuntu

A comprehensive list of commands needed when using Ubuntu:

Command privileges.

sudo command - run command as root
sudo su – root shell open
sudo su user – open shell as a user
sudo -k – forget your password sudo
gksudo command – sudo visual dialog (GNOME)
kdesudo command – sudo visual dialog (KDE)
sudo visudo – edit / etc / sudoers
gksudo nautilus – root file manager (GNOME)
kdesudo konqueror – root file manager (KDE)
passwd – change your password

Command Network


ifconfig – displays information network
iwconfig – displays information from wireless
sudo iwlist scan – scan wireless networks
sudo /etc/init.d/networking restart – reset the network
(file) /etc/network/interfaces – manual configuration
ifup interface – bring online interface
ifdown interface – disable interface

Commands Display

sudo /etc/init.d/gdm restart – reset X (Gnome)
sudo /etc/init.d/kdm restart – reset X (KDE)
(file) /etc/X11/xorg.conf – show Configuration
sudo dpkg-reconfigure - reconfigure xserver-xorg-phigh - reset configuration X
Ctrl+Alt+Bksp – X display reset if frozen
Ctrl+Alt+FN – switch to tty N
Ctrl+Alt+F7 – switch back to X display

Commands Service System.

start service – service to start work (Upstart)
stop service – service to stop working (Upstart)
status service – check if service is running (Upstart)
/etc/init.d/service start – start service (SysV)
/etc/init.d/service stop – stop service (SysV)
/etc/init.d/service status – check service (SysV)
/etc/init.d/service restart – reset service (SysV)
runlevel – get current runlevel

Commands for Firewall.

ufw enable – turn on the firewall
ufw disable – turn off the firewall
ufw default allow – allow all connections by default
ufw default deny – drop all connections by default
ufw status – current rules and
ufw allow port – to allow traffic on port
ufw deny port – port block
ufw deny from ip – ip block

Command System.


lsb_release -a – get the version of Ubuntu
uname -r – get kernel version
uname -a – get all the information kernel

Commands for Package Manager.


apt-get update – refresh updates available
apt-get upgrade – update all packages
apt-get dist-upgrade – version update
apt-get install pkg – installing pkg
apt-get remove pkg – uninstall pkg
apt-get autoremove – removing packages obsotletos
apt-get -f install – try to fix packages
dpkg –configure -a – try to fix a broken package
dpkg -i pkg.deb – install file pkg.deb
(file) /etc/apt/sources.list – list of repositories APT

Special Packages For commands.

ubuntu-desktop – Setting the standard Ubuntu
kubuntu-desktop – KDE Desktop
xubuntu-desktop – desktop XFCE
ubuntu-minimal – core earnings Ubuntu
ubuntu-standard – the standard utilities Ubuntu
ubuntu-restricted-extras – not free, but useful
kubuntu-restricted-extras – ditto KDE
xubuntu-restricted-extras – ditto XFCE
build-essential – packages used to compile
linux-image-generic – latest generic kernel image
linux-headers-generic – latest headlines

Applications commands.

nautilus – File Manager (GNOME)
dolphin – File Manager (KDE)
konqueror – Web browser (KDE)
kate – text editor (KDE)
gedit – text editor (GNOME)

Tuesday, October 6, 2009

Troubleshooting Checkpoint VPNS with IKEVIEW

Using IKEVIEW for VPN debugging

IKEVIEW is a Checkpoint Partner tool available for VPN troubleshooting purposes. It is a Windows executable that can be downloaded from Checkpoint.com. Ikeview was originally only available to Checkpoint's CSP partners however they will gladly supply you a copy of thie file if you have a licensed Checkpoint product. This file parses the IKE.elg file located on the firewall.

To use IKEVIEW for VPN troubleshooting do the following:

1. From the firewall type the following:

vpn debug ikeon

This will create the IKE.elg file located in $FWDIR/log


2. Attempt to establish the VPN tunnel. All phases of the connection will be logged to the IKE.elg file.


3. SCP the file to your local desktop.
WINSCP works great

4. Launch IKEVIEW and select File>Open. Browse to the IKE.elg file.


Understanding the IKE.elg output

All Phase I packets will either be labeled Main Mode or Aggressive Mode.

Phase II packets will be labeled QM or Quick Mode.

An arrow pointing to the left (<) indicates IPSEC packets that the Checkpoint firewall (local) receives from the remote Peer. An arrow pointing to the right (>) represent IPSEC packets that the Checkpoint firewall is sending to the remote peer.

Ikeview Phase I Main Mode exchange:

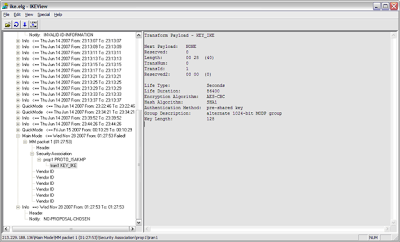
If your encryption fails in Main Mode Packet 1, then you need to check your VPN proposal (encryption/hash/lifetime).


Packet 2 ( MM Packet 2 in the trace ) is from the responder to agree on one encryption and hash algorithm


Packets 3 and 4 aren’t usually used when troubleshooting. They perform key exchanges and include a large number called a NONCE. The NONCE is a set of never before used random numbers sent to the other part, signed and returned to prove the parties identity.


Packets 5 and 6 perform the authentication between the peers. The peers IP address shows in the ID field under MM packet 5. Packet 6 shows that the peer has agreed to the proposal and has authorised the host initiating the key exchange.
If your encryption fails in Main Mode Packet 5, then you need to check the authentication - Certificates or pre-shared secrets

Phase I Main Mode example:

In the example below, we see that Phase I is failing after the first packet (Main mode Phase I takes 6 packets to complete). After the first packet (the initial proposal packet), we see that the remote peer responds with No Proposal Chosen. In this example, the remote peer rejected the local proposal of AES/SHA1 with a lifetime of 86400 seconds and the provided Preshared key.


Phase II Quick Mode exchange:

Next is Phase II - the IPSec Security Associations (SAs) are negotiated, the shared secret key material used for the SA is determined and there is an additional DH exchange. Phase II failures are generally due to a misconfigured VPN domain. Phase II occurs in 3 stages:

1. Peers exchange key material and agree encryption and integrity methods for IPSec.
2. The DH key is combined with the key material to produce the symmetrical IPSec key.
3. Symmetric IPSec keys are generated.


In IkeView under the
IP address of the peer, expand Quick Mode packet 1:
> "P2 Quick Mode ==>" for outgoing or "P2 Quick Mode <==" for incoming > QM Packet 1

> Security Association

> prop1 PROTO_IPSEC_ESP

> tran1 ESP_AES (for an AES encrypted tunnel)

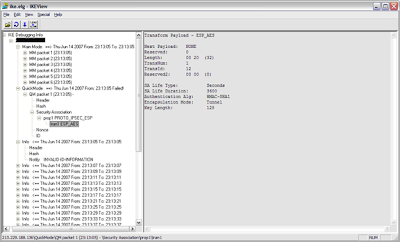
You should be able to see the SA life Type, Duration, Authentication Alg, Encapsulation Mode and Key length.
If your encryption fails here, it is one of the above Phase II settings that needs to be looked at.

There are two ID feilds in a QM packet. Under

> QM Packet 1

> ID

You should be able to see the initiators VPN Domain configuration including the type (ID_IPV4_ADDR_SUBNET) and data (ID Data field).

Under the second ID field you should be able to see the peers VPN Domain configuration.

Packet 2 from the responder agrees to its own subnet or host ID, encryption and hash algorithm.

Packet 3 completes the IKE negotiation.


Phase II Quick Mode example:

Below is a screenshot of a failed VPN connection for Phase II. From this example, we can see that Phase I(Main Mode) completed successfully. Phase II (Quick Mode) shows a Failed status.

As indicated below, there is an Outgoing proposal (local peer) for AES/SHA1 with a lifetime of 3600 seconds. After the failed Phase II packet, there is an Info packet from the remote peer indicating “Invalid ID Information”. This is an indication that the remote peer rejected our proposal. If the tunnel were being initiated on the Remote End, we would also see the remote peer’s proposal and can compare that to the local proposal.


Common errors indicated in Ikeview

No Proposal Chosen:

A common error that can be easily identified in IKEVIEW is “No Proposal Chosen”.

In the Quick Mode section that is followed by the info line displaying the “No Proposal Chosen” message should display the network mask used for the VPN handshake. Compare the mask used in the local encryption domain with the mask sent by the remote peer. This is a common error when establishing tunnels with non-Checkpoint firewalls. Checkpoint, by default, supernets networks contained in the encryption domain. The method for resolving this issue on the Checkpoint firewall differs depending on if the firewall is R55, R61 simple mode, or R61 classic mode. In R55 there is an option in the VPN section of the Interoperable firewall object that tells the Firewall for “One tunnel per pair of hosts, or one tunnel per pair of subnets”. In R61 Simple mode, there is an option in the VPN Community that says “exchange key per host”. In R61 Classic mode you will need to do the following during non-business hours:

CP Stop

Modify the $FWDIR/lib/user.def.

Change the parameter "IKE_largest_possible_subnet" from true to "false".

CP start.


Aggressive Mode failure:

Aggressive mode uses 3 packets instead of 6 during the Phase I negotiations. Therefore if 1 side of the tunnel is configured for Aggressive Mode and the other side is configured for Main Mode, the 2 peers will not agree with the contents of the first packet during the exchange. If the local peer is mistakenly configured to use Aggressive Mode (which is a less secure method), the outgoing packet will be labeled Aggressive Mode.


Invalid ID-Information:


This is an indication that the remote peer rejected either the Phase I or Phase II proposal from the local peer.


PROTO_IPCOMP in the QM packet

This is an indication that IP Compression is enabled for this tunnel.

Nokia IPSO Password reset

Boot the Nokia device into single user mode

To boot an IP440 into single user mode first restart the box.. When you see the "boot:" prompt enter "-s" and press "enter" within 10 seconds. When it boots into single user mode it will ask for the shell, just press "enter" to accept the default "sh."

To boot an IP500 or higher into single user mode, first restart the box. When you will see the prompt "Entering autoboot mode. Type any character to enter command mode." You have 5 seconds to press any key.

To boot at IP300 device into single user mode, first restart the box. When you see the prompt "Verifying DMI Pool Data" press the number 1. Then you will see a "Type any character to enter command mode." You now have 5 seconds to press any key. After pressing any key type "boot -s" to enter single user mode.

Change Password in IPSO 3.5 and Higher

Run "/etc/overpw" from the single user shell and follow the prompts to change the password. Type "reboot" to boot into multi-user mode, go into voyager and change to a permanent password.

Usefull Checkpoint Commands

o view the active connections table: fw tab -t host_table –s

To pull the latest policy from the management station: fw fetch

Display the name of the policy installed and the date it was received: fw stat

View the Checkpoint version installed: fw ver

Display cpu, memory, and disk usage: fw ctl pstat

Delete all hosts from the connections table: fw tab -t host_ip_addrs –x

Display logs on the firewall for a specific IP: fw log –n –ft | grep

Troubleshoot source/destination access issues: fw monitor -m iIOo -e 'accept src=10.33.76.82 and dst=10.33.76.82;'

Manage VPN connections (view and delete): vpn tu

Turn on debugging for VPN's: vpndebug on and vpn debug ikeon

This will create 2 files in $FWDIR/logs. vpnd.elg (this can be viewed on the firewall using cat. It will show highlevel VPN connection information), and ike.elg (this is the bread and butter of Checkpoint VPN troubleshooting. Click here to read my ikeview guide).

Display SIC key: cp_conf sic get

High Availabiliy: cphaprob stat -display HA status

cphaprob -i -display HA interface stats

cphastop/cphastart -stop/start HA


View license key installed: cplic print


Delete all active hosts: fw tab -t host_ip_addrs –x

Checkpoint FW Monitor

w monitor shows you what the checkpoint kernel sees, and monitors all interfaces at once

Flag


Description

-d


Turn on debug flag

-D


Specify an INSPECT program line (multiple -e options can be used)

-f


INSPECT filter name. '-' can be used to specify standard input. The -f and -e options are mutually exclusive

-l


Specify how many bytes of the packet should be transferred from the kernel.

-m


Specify inspection points mask, any one or more of i, I, o, O as explained above. This feature only works on 4.0 SP3 or later.

-o


Specify an output file, which can be viewer with the 'snoop' command on Solaris.

-x


Perform a hex dump of the received data, starting at specified offset and printing out 'len' bytes.


Examples:

fw monitor -m iIoO -e "accept src=192.168.191.18;"
fw monitor -m iIoO -e "accept dport=500;"
fw monitor -m iIoO -e "accept dst=192.168.27.198;"
fw monitor -m iIoO -e "accept dst=192.168.2.3;" -o /var/tmp/SOCD00008413514
fw monitor -m iIoO -e "accept src=192.168.160.45 or dst=172.16.160.45;"

fw monitor -m iIOo -e 'accept src=10.33.76.82 and dst=10.33.76.82;'


VIEWING OUTPUT:


The little "i" means the packet is incoming to the interface specified.

The big "I" means the packet is incoming to the checkpoint filter

The little "o" means the packet is leaving the filter

the big "o" means the packet is hitting the wire on the interface specified

Secure Remote Debugging

Client side debugs:

To start, execute:

% sc debug on

To stop, execute:


% sc debug off

The debug file is located under sr_service_tde.log, under the SecuRemote installation

folder, for example: C:\Program files\CheckPoint\SecuRemote.

Location of the Topology downloads:

C:\program files\CP\SecRemote\userc.C

Usefull Nokia IPSO Commands

newimage -R -k -l ipso.tgz - install a new IPSO image

newpkg –i installs software from given location (firewall software, VPN accel driver, etc)


voyager –e 0 80 resets voyager after a failed ssl config attempt

dbpasswd admin -Changes the password from the command line

ipsofwd on admin -turns on ip forwarding when firewall is stopped

ipsofwd list -displays ipso properties (flowpath, etc)

ipsofwd slowpath -turns off flows (flowpath turns back on)

iclid -vrrp utility that shows status

- show vrrp -iclid command that shows # of interfaces and their respective states

- get vrrp -shows iclid stats: active interfaces/checksum/version/id

-show vrrp interface -displays interface stats for VRRP
boot –s {from > prompt at boot time) boots into single-user mode

Nokia IPSO has 2 shells, IPSO and Clish.

After logging in, you are in the IPSO shell. To enter the Clish shell, type "clish"

To remove old config:
Either rm /active/config or config/active depending on version.

Common CLISH Commands

This is a quick reference guide to the most popular and widely used Nokia Clish Commands. You can manage the Nokia firewall as much from the Command Line Interface as from Voyager.
---setting default gateway
set static-route default nexthop gateway address 192.168.29.2 priority 1 on
---adding static routes
set static-route 172.23.124.150/32 nexthop gateway address 192.168.29.50 on
---Add proxy arp
add arpproxy address 192.168.29.56 macaddress 0:a0:8e:7d:13:d0
add arpproxy address 192.168.29.57 macaddress 0:a0:8e:7d:13:d0

---Add an interface
set interface eth1 speed 100M duplex full active on
add interface eth1c0 address 192.168.29.54/24 enable

---VRRP
set vrrp accept-connections on
set vrrp coldstart-delay 60
set vrrp interface eth1c0 monitored-circuit vrid 54 monitored-interface eth2c0 on
set vrrp interface eth1c0 monitored-circuit vrid 54 monitored-interface eth2c0 priority-delta 10
set vrrp interface eth1c0 monitored-circuit vrid 54 monitored-interface eth3c0 on
set vrrp interface eth1c0 monitored-circuit vrid 54 monitored-interface eth3c0 priority-delta 10
set vrrp interface eth1c0 monitored-circuit vrid 54 priority 100
set vrrp interface eth1c0 monitored-circuit vrid 54 hello-interval 1
set vrrp interface eth1c0 monitored-circuit vrid 54 vmac-mode default-vmac
set vrrp interface eth1c0 monitored-circuit vrid 54 backup-address 192.168.29.1 on

---Set ntp servers
add ntp server 10.1.1.2 version 3 prefer yes
add ntp server 10.1.1.1 version 3 prefer yes

---Setting Time zone
set date timezone-city "Greenwich (GMT)"
---Add hostname
set hostname testbox
---Add Host address assignments
add host name testbox ipv4 192.168.29.54

Checkpoint VPN stats

fw tab -t peers_count -s
HOST NAME ID #VALS #PEAK #SLINKS
localhost peers_count 502 81 90 0

fw tab -t userc_users -s
HOST NAME ID #VALS #PEAK #SLINKS
localhost userc_users 120 62 105 0

View last 10 policies installed on a Checkpoint firewall

fw stat -l

Monday, October 5, 2009

Uninstall all patches on windows xp

C:\>dir /a /b c:\windows\$ntuninstallkb* > kbs.txt && for /f %i in (kbs.txt) do cd c:\windows\%i\spuninst && spuninst.exe /passive /norestart && ping -n 15 localhost > nul